
All you need to know to use make the Linux kernel support your own hardware.

Overview
Everything you need to know to make the Linux kernel boot on your new embedded board and write drivers for its specific hardware devices. Learn how to describe your hardware with the device tree, and debug the kernel code (written by yourself or by the community).
Also learn how to contribute changes back to the upstream version of Linux, to reduce your own maintenance costs, make support for your hardware ubiquitous and enjoy contributions from the Linux kernel developer community.
Using progressive but challenging practical labs and varied techniques to make the learning always stimulating and fun, and above all to make it stick. At least 75% of the time is dedicated to practical activities. Learn by doing!
Description
| Delivery | In-person (all continents) or online, public or private session |
| Language | English or French |
| Mix | 25% theory – 75% practical activities – Learn by doing! |
| Duration | 5 days (in-person), 32 hours (online) |
| Hardware | BeaglePlay board with TI Sitara AM625 SoC (ARM64) |
| Linux kernel version | 6.12 (LTS) used in practical labs |
| Prerequisites | Familiarity with the Linux command line |
Upcoming sessions
| Trainer | Dates | Cost | Register |
| Michael Opdenacker | Dec 7-10, 11-17, 2026, online 15:00 to 19:00 UTC+2 Seats left | 1190 EUR 1, 2, 3 |
1 We want our training to be accessible to individuals around the world. If our standard rate is a barrier due to local income levels, please apply anyway — we’ll do our best to offer a suitable price.
2 Individuals (from the European Union, not paying through a company) are subject to + 20% V.A.T. However, we offer a discount on the base cost to cancel the impact of V.A.T. and keep the same total price. See also 1.
3 Only for French companies: + 20% V.A.T.
If V.A.T. is applicable, it applies to the amounts before V.A.T.
Available discounts
The below discounts can be combined, up to a limit of 200 EUR per participant.
- 100 EUR returning participant discount for any extra course taken by the same participant (same invoicing entity) at most 12 months after another one.
- 100 EUR early bird discount for any registration at least 1 month before the session dates.
- 100 EUR extra participant discount for each participant from the same entity (same invoicing address) in addition to the first one.
A special 25% discount (which cannot be combined with the above ones) is also offered to FOSS project contributors paying the course by themselves. Share references to your contributions with us at registration time, to know whether you are eligible for such a discount.
Private sessions
This course can be taught in a private session anywhere in the world, either in your company’s premises or online. This offers more privacy and allows for customization options.

Agenda
Configuring, building, booting and kernel modules
- Presentation of the hardware
- Big picture: Linux kernel in the whole system. Interface with user applications.
- Lab: board setup, serial port access, U-Boot setup, tftp networking between the board and PC.
- Retrieve Linux kernel sources. Understand the Linux release process and choose a version for your project.
- Lab: clone the mainline “stable” source tree with
git - Linux kernel source code. Technical and licensing constraints.
- Kernel source management tools
- Lab: Exploring kernel source code
- Configure the Linux kernel. Guided tour of most interesting options.
- Cross-compiling the kernel. Speed up this build.
- Lab: configuring and compiling the kernel
- Install the kernel and modules
- Boot the kernel from the bootloader. Device Tree and kernel command line
- Lab: kernel booting, NFS root filesystem
- Using and writing kernel modules. Programming constraints.
- Lab: create your first module, add parameters, access kernel internals. Check compliance with kernel coding standards.
Part 2: Device model – Bus, drivers and devices

- How the kernel abstracts and binds busses, devices and drivers.
- Case of busses supporting device enumeration: USB and PCI
- Device Tree: how to describe hardware that cannot be detected.
- How to validate your Device Tree.
- Lab: browse and update Device Trees. Drive GPIO LEDs.
- Example: the I2C bus.
- Understanding pin multiplexing.
- Lab: enable pin multiplexing for I2C buses. Add description of I2C gamepad device.
- Device and driver model. Bus drivers.
- USB device driver example.
- Probing of devices.
- Platform devices and drivers.
- Example: I2C and writing I2C device drivers.
- Lab: create a basic I2C driver for the gamepad device. Bind the driver to the device.
- Communication over the I2C bus.
- Lab: initialize the I2C device and read the states of the joystick and buttons.
Part 3: Kernel frameworks, memory and I/O
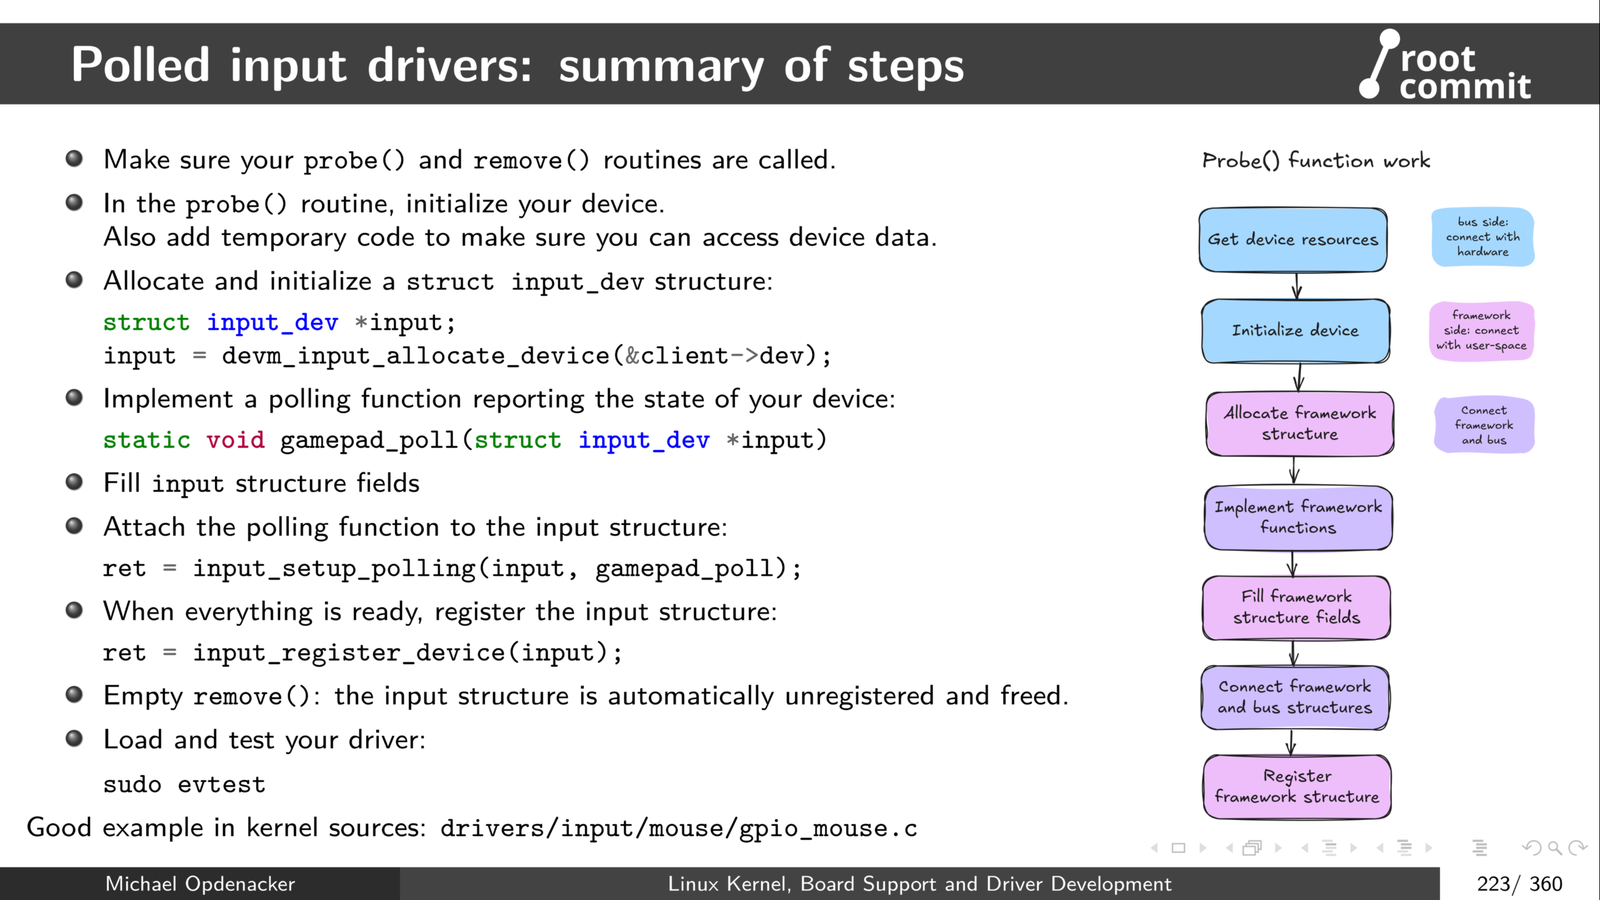
- Kernel frameworks: abstracting devices in user-space.
- Device-managed allocations.
- Example: the Input subsystem. How to register and implement input devices.
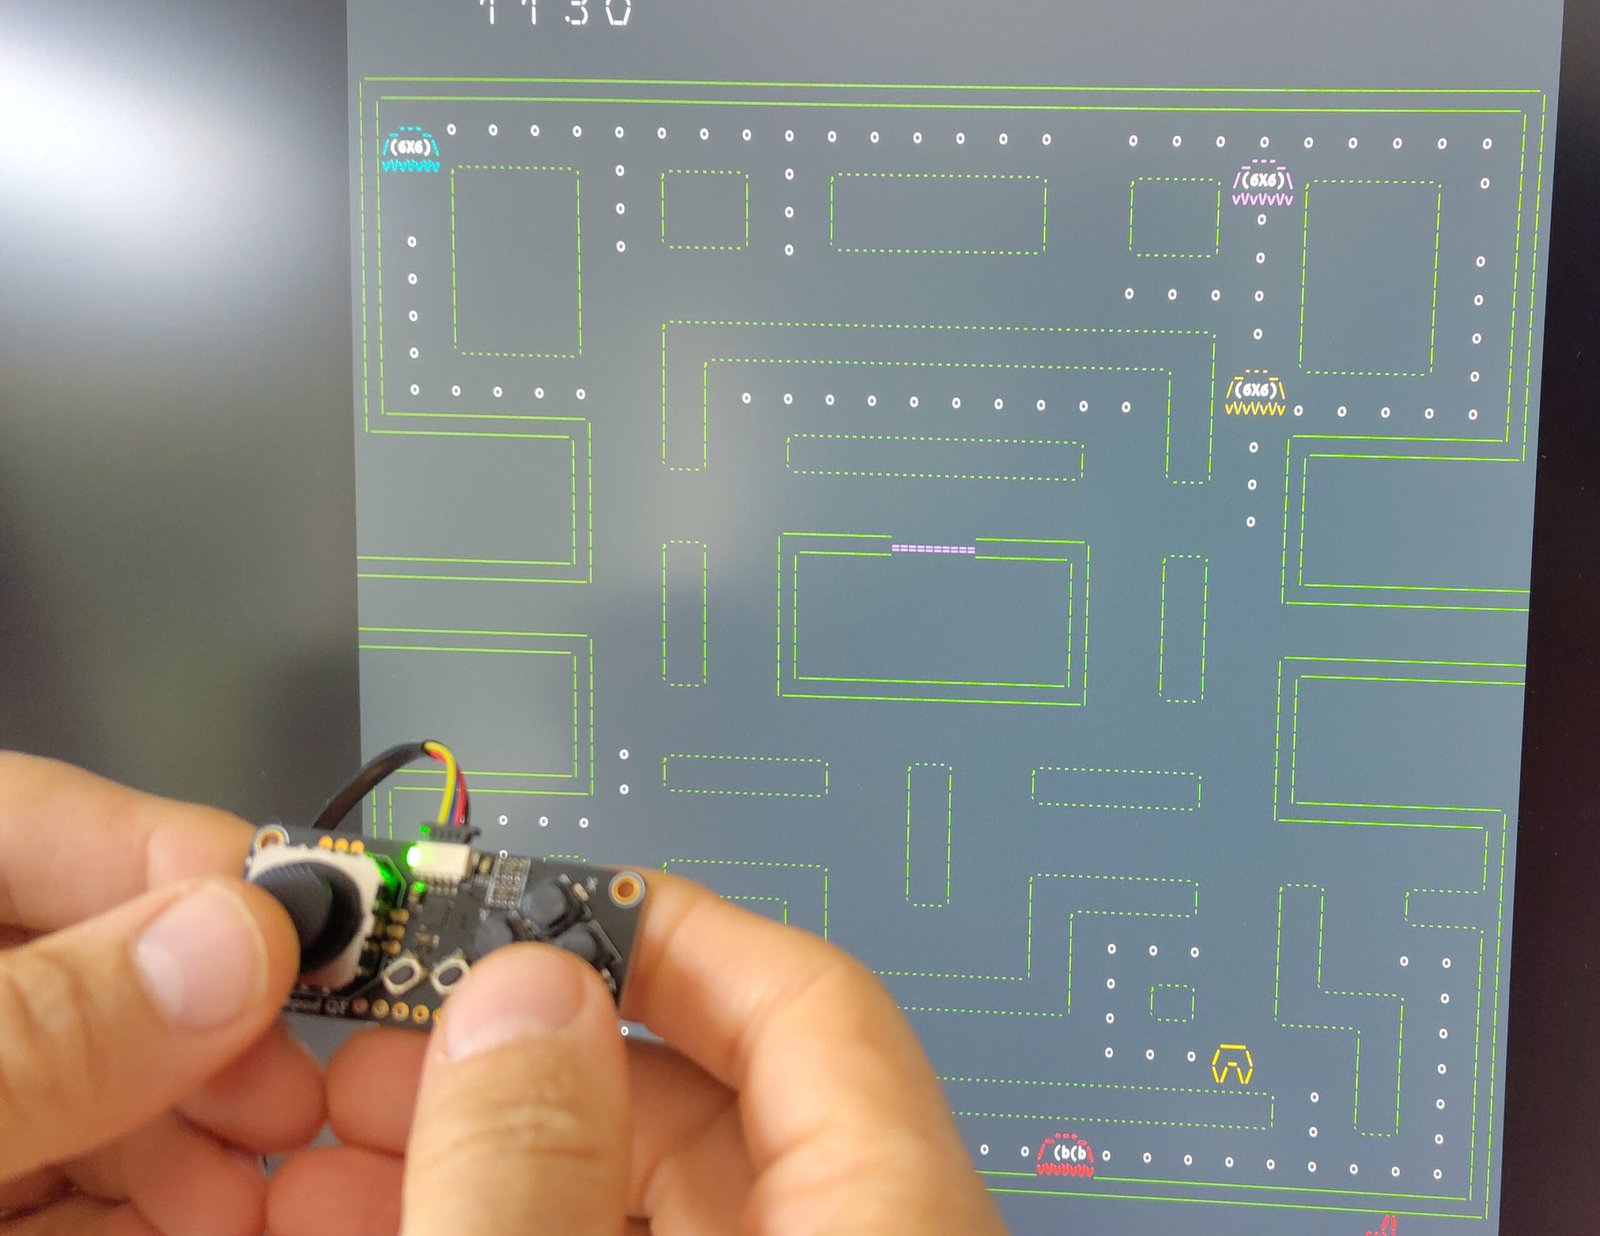
- Lab: completing the I2C driver: exposing device data to userspace. Play ASCII games with the gamepad.
- Kernel memory management
- Available memory allocators.
- Kernel memory debugging.
- Reserving and mapping I/O memory (registers).
- Lab: add UART devices to Device Tree. Access I/O registers to write data to board serial ports.
- Character driver operations: read, write, ioctl(). Exchanging data with user-space.
- The Misc subsystem. How to register Misc devices.
- Lab: output-only serial port driver.
Part 4: Interrupts, deferring work, locking
- Processes and scheduling. Waiting for a condition.
- Support for interrupts to process hardware events.
- Lab: read data received on the serial ports.
- Managing concurrency issues. Lock based and lock-less primitives. Debugging locks.
- Lab: torture the serial driver using parallel writer threads. Expose bugs due to concurrency issues and fix them through locking.
Part 5: Board support, debugging, testing and contribution
- Available techniques for kernel debugging.
- Lab: debug and fix a broken kernel driver with multiple issues.
- How to support a new board. How SoCs are supported.
- Kernel testing. Performance analysis.
- Lab: performance analysis with perf and ftrace.
- Kernel development best practices: error handling, coding conventions.
- Locate specific issue by bisecting kernel code.
- How to contribute to the upstream Linux kernel.
- In particular, how the b4 tool helps with testing patches and contribute your own changes.
- Getting involved: ideas for kernel contribution.
- Conferences and useful resources.
- Q&A session.
What is provided?
| In-person public sessions | In-person private sessions | Online public sessions | |
|---|---|---|---|
| Electronic board and all its required accessories, for the duration of the course | ✅ | ✅ | ❌ |
| Lunch, morning and afternoon breaks | ✅ | ❌ | ❌ |
| Electronic copies of the lecture and practical lab materials. | ✅ | ✅ | ✅ |
| Solutions to practical labs | ✅ | ✅ | ✅ |
| Video recordings of the lectures from the trainer. | ❌ | ❌ | ✅ |
| Electronic training certificate, after successful completion of the course, which can be shared on your LinkedIn profile and on other social media. | ✅ | ✅ | ✅ |
What’s special in our courses?
Majority of practical activities, representing at least 75% of learning time.
Short lectures only: sequences of theory never exceed 30 minutes, and are interleaved with quick or longer practice. Too long series of lectures are hard to digest, especially in an online setting.
Technical and teaching experience: courses taught by an industry veteran with more than 20 years of experience in embedded Linux and 30 years using and advocating for Free and Open Source Software.
See also: Why choose Root Commit courses?
FAQ
Q: Will I get solutions to the practical labs?
A: Yes, C code and Device Tree solutions are shared at the end of each lab.
Q: In-house sessions: can practical labs be run on the CPU that my project uses?
A: The Linux kernel tries to offer the same mechanisms for all types of hardware, so most of what you learn on another platform should apply on other ones as well. Another reason to stick with our standard instructions is that the some drivers we develop during the labs depend on the CPU being driven, in particular its hardware registers. Therefore porting our practical labs to different hardware remains possible, if you are ready to accept additional preparation costs.
See also our FAQ for all types of courses and our sustainability efforts.